High Altitude Conversions

BAKING CONVERSIONS
You may need to modify recipes for multiple ingredients, depending on the recipe and your altitude. Find our baking conversion chart below to help with the amount of adjustments you may need to make.
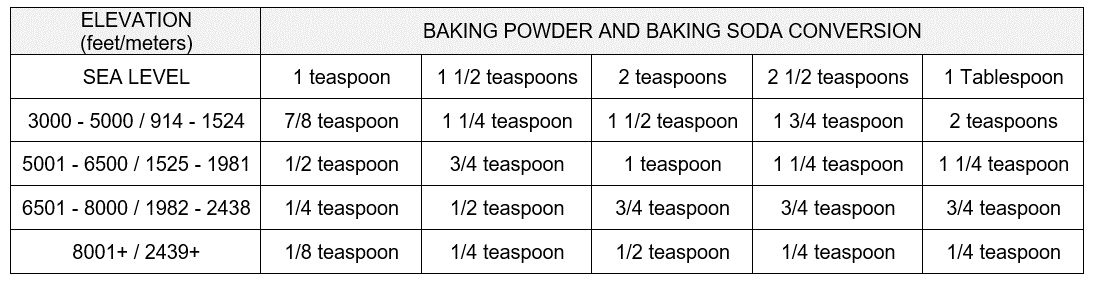
BAKING POWDER AND BAKING SODA CONVERSIONS BY ELEVATION
Reduce Leavening
At high altitudes, the lower atmospheric pressure allows the carbon dioxide gases produced by leavening agents to expand much more rapidly and forcefully than they would at sea level. If you use the standard amount of baking powder or baking soda, your cake or bread will rise too quickly before the cell structure has time to set. This often leads to a dramatic, tall rise in the oven - followed by a collapse in the center as the over-stretched air bubbles burst.
To prevent this, the following chart provides reduction ratios based on your elevation. In general, for every teaspoon called for in a recipe, you may need to reduce it by 1/8 to 1/4. This adjustment ensures a steady, controlled, rise that allows the flour and eggs to solidify around the air pockets, resulting in a stable crumb. Remember, baking soda also acts as a tenderizer; by reducing it, you aren't just controlling the rise, but also ensuring the structure of your bake remains firm enough to hold its shape.
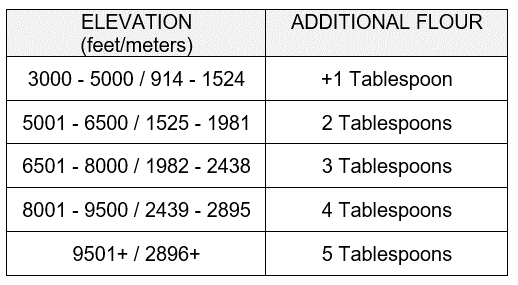
FLOUR CONVERSIONS BY ELEVATION
Structural Integrity
One of the most common issues in high-altitude baking is structure. Because leavening gases expand more rapidly and moisture evaporates faster, the protein structure of your baked goods is under constant pressure. Even a small amount of extra flour acts as reinforcement for your dough and batter. This provides starch and extra gluten, which creates a sturdier web of proteins to trap the expanding gases effectively.
Our flour conversion chart suggests adding 1 to 2 tablespoons of flour per cup of flour in the original recipe as you rise in altitude. This adjustment is particularly crucial for delicate structures like muffins and sponge cakes. Beyond structural integrity, the extra flour helps counteract the fact that high-altitude air is incredibly dry. You compensate for the rapid evaporation that occurs when the oven door opens, by slightly increasing the solids in your recipe. This gives you a stable baked good wirh a satisfying, hearty bite.
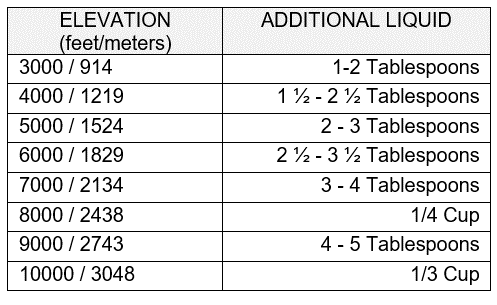
LIQUID CONVERSIONS BY ELEVATION
Hydration in Mountain Air
Because atmospheric pressure is lower at higher elevations, the boiling point of water decreases. The change causes liquids to evaporate much faster—both on the counter and in the oven. You may find your dough gets crumbly or your baked good is dry when you follow a sea-level recipe exactly. To maintain moist baked goods, increasing the liquid content is essential .
This chart details how much extra water, milk, or juice to add to keep your bakes moist. Typically, at 3.500 feet, you might add an extra 1 to 2 tablespoons of liquid per cup, and even more as you go higher. This extra moisture serves two purposes: it compensates for the liquid lost to the air during mixing and baking, and it provides the extra steam needed to help the dough "stretch" without tearing. Furthermore, since sugar becomes more concentrated as liquid evaporates, the extra hydration prevents your treats from becoming overly sweet or gummy.
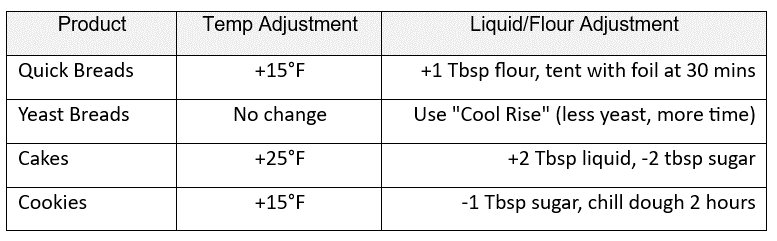
TEMPERATURE AND INGREDIENT ADJUSTMENTS BY ELEVATION
Quick Breads, Yeast Breads, Cakes, and Cookies
Baking at 3,000 feet or higher requires a multi-faceted approach. It’s not just about a single ingredient; it’s about the combination of temperature, sugar, and fat. Because the structure of a cake or cookie takes longer to set at high altitudes, increasing the oven temperature by 15°F -25°F is a common tactic. This bakes the exterior of the product before the internal gases can over-expand and cause a collapse.
The chart below covers these intertwined shifts. For instance, reducing sugar is often necessary because evaporation concentrates the sugar, which can weaken the gluten structure and lead to a sticky, sunken baked good. Similarly, decreasing fat or slightly increasing egg content can provide the extra substance needed to hold everything together. Whether you are making a delicate sugar cookie or dense quick bread, these adjustments for temperature, sugar and fat are crucial to achieving professional results at mountain altitude.
COOKING CONVERSIONS
Need a handy conversion chart for cooking, canning and candy making? We have everything you need to view boiling temperatures by altitude, canning pressure and processing time by elevation and a candy temperature guide by altitude.
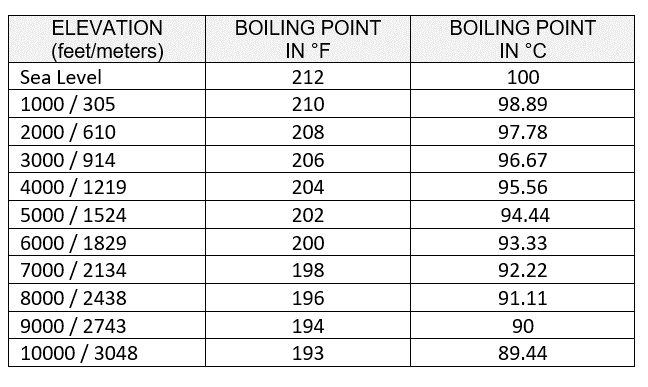
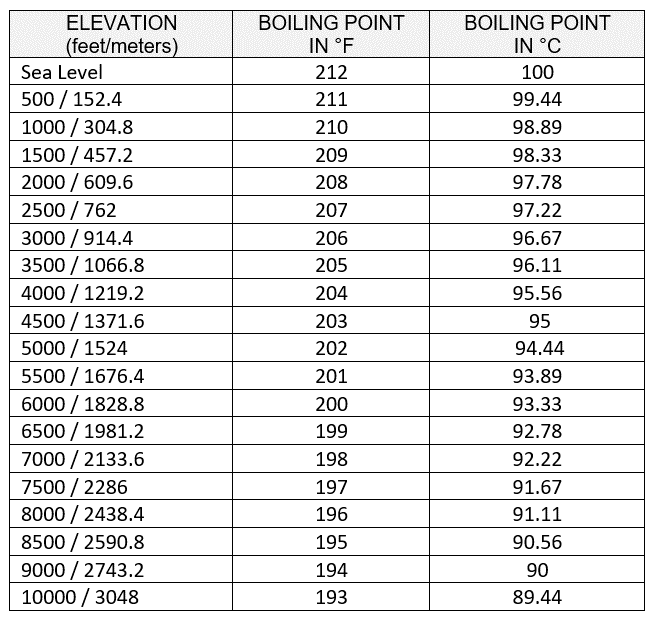
BOILING POINT TEMPERATURES BY ELEVATION
Why Your Water Isn't as Hot as You Think
At sea level, water boils at a predictable 212°F / 100°C. However, for every 500 feet of elevation gain, the boiling point drops by approximately 1°F. This is one of the most fundamental rules in high-altitude cooking. While your pot of water may be bubbling vigorously, it is actually at a lower temperature than it would be at sea level. Foods cooked in boiling water—like potatoes, pasta, or beans—will take significantly longer to reach the desired tenderness.
This chart is a needed reference for any stovetop cooking at high altitude. If you are boiling an egg at 7,000 feet, the water is only reaching about 198°F. Understanding this temperature shift prevents the frustration of underdone rice or undercooked vegetables. It also explains why higher heat on your stove doesn't always translate to faster cooking times. You are limited by the physical ceiling of the water's boiling point, making patience—and a good thermometer—your best kitchen assets.
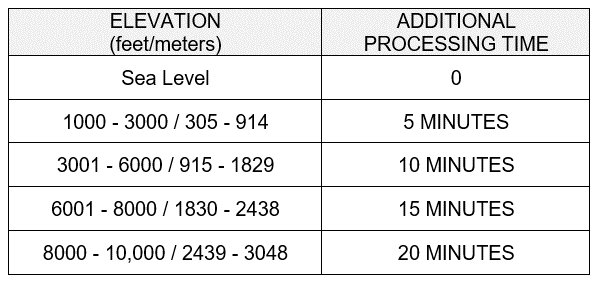
CANNING PROCESSING TIME BY ELEVATION
Food Safety in a Water Bath
Water bath canning relies on the heat of boiling water to kill microorganisms and create a vacuum seal. Since water boils at a lower temperature at high altitudes, this property of boiling water is diminished. If you use sea-level processing times at higher altitudes, you will not be heating the contents of the jar long enough to ensure they are shelf-stable, which poses a risk of foodborne illness or spoilage.
To make up for the lower temperature, you must increase the time the jars spend in the boiling water. The following chart provides the necessary additional process time, in minutes, based on your specific altitude bracket. For example, a recipe requiring 15 minutes at sea level might require 20 or 25 minutes at higher elevations. This ensures that the internal temperature of the food reaches the safety threshold required to neutralize mold, bacteria, and yeast, giving you peace of mind that your home-preserved goods are safe for your family to enjoy.
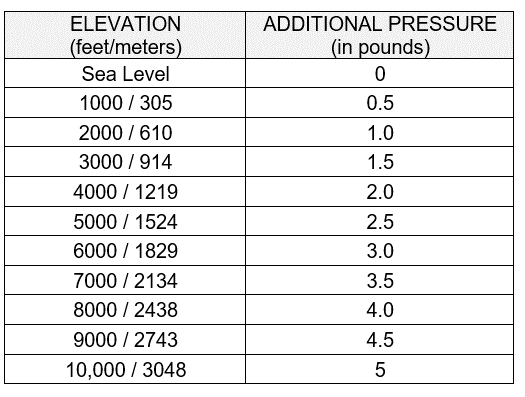
CANNING PRESSURE BY ELEVATION
Adjusting for Low-Acid Food Preservation
When canning low-acid foods like vegetables, meats, and poultry, a water bath isn't enough. These foods require a pressure canner to reach 240°F - the temperature needed to destroy botulism spores. However, pressure gauges are calibrated based on atmospheric pressure. At high altitudes, the air is lighter, so the pressure inside the canner must be increased to achieve that critical 240°F internal temperature.
If you are using a weighted gauge or a dial gauge, you cannot follow the rule at sea level of 10 pounds of pressure. This chart outlines the necessary increases to compensate for your elevation. Failing to adjust the pressure means your food may never reach the temperature necessary for sterilization, even if the gauge says it’s pressurized.
CANDY TEMPERATURES BY ELEVATION
Precision Sugar Work at Elevation
Candy making is a mix of temperature and concentration. Recipes usually specify stages like "Soft Ball" (235°F) or "Hard Crack" (300°F). These stages correspond to the concentration of sugar as water evaporates. However, at high altitude, because water evaporates much faster and at lower temperatures, your candy will reach these stages sooner than a sea-level thermometer would suggest.
To avoid ending up with a rock-hard caramel when you wanted a soft one, you must adjust your target temperatures. The rule of thumb is to subtract the difference between the local boiling point and the sea-level boiling point from the recipe’s temperature.